- Magento Requests With Commerce Bug
- Finding a Block’s Name in Magento
- Creating a New Magento Customer Page
- Magento 2 and Commerce Bug
- Commerce Bug 3 for Magento 2
Every few months a Stack Overflow or StackExchange user will ask how to add a new customer page to Magento’s “My Account” section. My instincts are to help, but there’s so much assumed knowledge required that it’s never clear which part of the process a user is stumbling with. Is it the layout system? They can’t figure out controller routing? They assume there’s a CMS UI for adding things? etc.
Teasing this information out of a near stranger can be like the death by a 1,000 cuts, (without the actual torture and death), so today we’re going to look at adding a new My Account page for logged in customers, and in the process we’ll learn how to use Commerce Bug’s features to diagnose any Magento sub-system.
The following tutorial was built using Magento 1.7.0.2. The code should work with Magento versions greater than and equal to 1.4.2.0 CE, and the concepts should apply to all version of Magento
High Level Steps and Following their Lead
From the 10,000 foot view, the four things we want to do are
- Add a new link to the left side navigation for our page
- Create a new controller action method to handle our new page
-
Ensure the controller action from number two only displays for logged in users
-
Add a Magento block to the new page
When working with any existing system, it’s always best to follow the patterns of the developers that came before you. While you might not always agree with how the Magento core team and their outsourced help built Magento, the fact is they both built and shipped Magento. Copying their patterns, (until you’re comfortable enough with the system to improve things), will rarely steer you wrong.
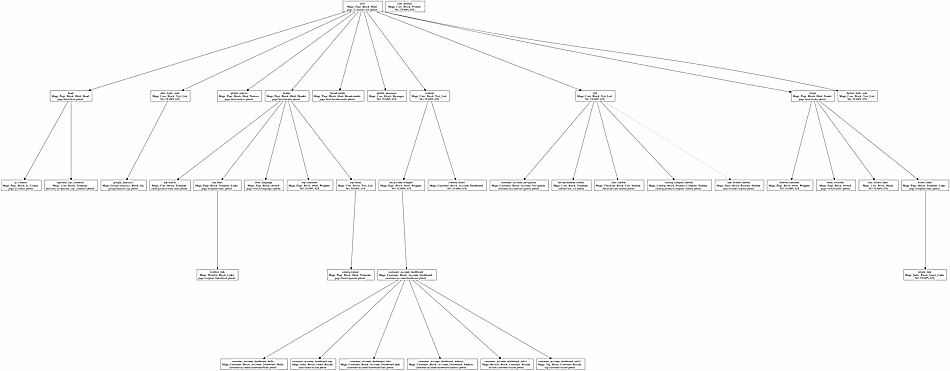
Step zero, as it so often is, is to use Commerce Bug’s graphviz tool to get the lay of the layout land. If we log in and navigate to an existing customer account page.
http://magento.example.com/customer/account/index/
and copy Commerce Bug’s “View Graphviz .dot Source” field (in the Layout tab) into a dot file, and then view that dot file with an appropriate application we’ll see a layout tree that looks something like this (click through for the full image)
Our first task will be adding a link to the existing customer navigation. Since this lives in the left sidebar, let’s zero in on the left Magento block.

We can see the core/text_list container block named left contains five child blocks (four pictured above). Of the five
customer_account_navigation
left.permanent.callout
cart_sidebar
catalog.compare.sidebar
sale.reorder.sidebar
The customer_account_navigation block seems like our best bet. In order to figure out how this block renders its links, let’s take a look at its template. The graphviz diagram lists the template as customer/account/navigation.phtml. If you’re unsure which theme file this corresponds to in your system, just use Commerce Bug’s Blocks tab
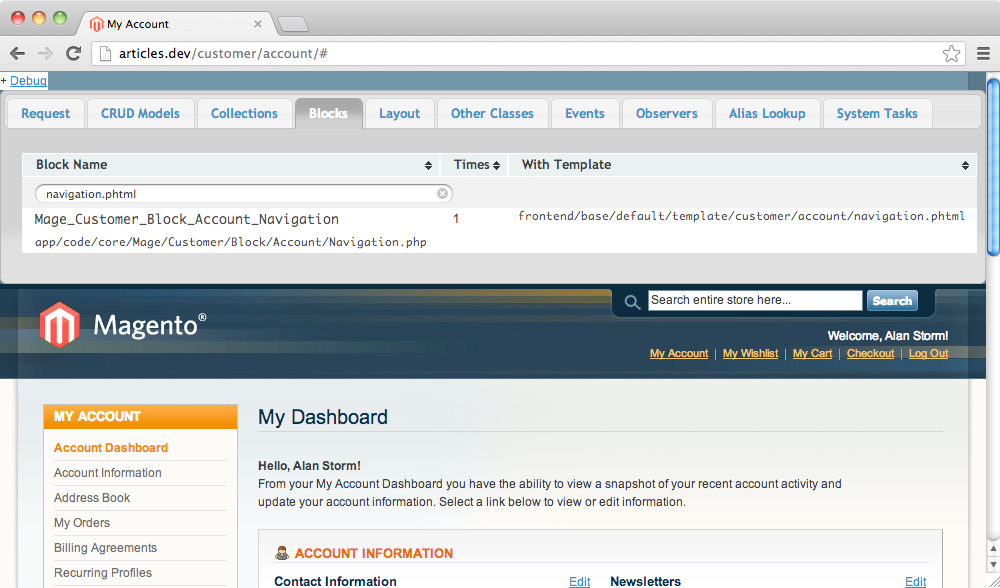
This will give you the full package and theme path to the template file (in our case, this is the default theme in the base design package). If we open up this file, we’ll see HTML something like the following
#File: frontend/base/default/template/customer/account/navigation.phtml
<ul>
    <?php $_links = $this->getLinks(); ?>
    <?php $_index = 1; ?>
    <?php $_count = count($_links); ?>
    <?php foreach ($_links as $_link): ?>
        <?php $_last = ($_index++ >= $_count); ?>
        <?php if ($this->isActive($_link)): ?>
            <li class="current<?php echo ($_last ? ' last' : '') ?>"><strong><?php echo $_link->getLabel() ?></strong></li>
        <?php else: ?>
            <li<?php echo ($_last ? ' class="last"' : '') ?>><a href="<?php echo $_link->getUrl() ?>"><?php echo $_link->getLabel() ?></a></li>
        <?php endif; ?>
    <?php endforeach; ?>
</ul>
Based on the code above, it looks like Magento calls the block’s getLinks method to return an array of link information,
#File: frontend/base/default/template/customer/account/navigation.phtml
<?php $_links = $this->getLinks(); ?>
and then loops over the array with a foreach statement.
#File: frontend/base/default/template/customer/account/navigation.phtml
<?php foreach ($_links as $_link): ?>
    //...
<?php endforeach; ?>
Our next logical question is: “Where does getLinks get its information from?”
Template to Block
When you use $this from a phtml template, you’re calling a method on the template’s block object. Commerce Bug already told us what this block was

So if we use the file path above to look at this block’s source code, we can see getLinks is defined as follows.
#File: app/code/core/Mage/Customer/Block/Account/Navigation.php
public function getLinks()
{
    return $this->_links;
}
Hmm. That’s not too helpful. We’ve just shifted our question from
Where does
getLinksget its information from?
To
What populates the
_linksobject property.
A deeper examination of this class file is in order. Jump to the top of your document, and use your text editor’s “Find Text” feature (probably Ctrl/Cmd-F) to search for the _links property. Its first mention will be at the top of the class file.
#File: app/code/core/Mage/Customer/Block/Account/Navigation.php
class Mage_Customer_Block_Account_Navigation extends Mage_Core_Block_Template
{

    protected $_links = array();
    //...
}
This is promising. As a protected class property, this means there’s no outside code that could have populated _links. In other words, the code that populates this protected property will be in the class file we’re looking at (Mage_Customer_Block_Account_Navigation). In some rare cases, it might be in a parent or child class. Let’s keep searching.
You should hit pay-dirt on your next mention
#File: app/code/core/Mage/Customer/Block/Account/Navigation.php
public function addLink($name, $path, $label, $urlParams=array())
{
    $this->_links[$name] = new Varien_Object(array(
        'name' => $name,
        'path' => $path,
        'label' => $label,
        'url' => $this->getUrl($path, $urlParams),
    ));
    return $this;
}
Eureka! The Mage_Customer_Block_Account_Navigation block exposes a public method named addLink. This is the layout action method we’ll want to call to add our link to the sidebar. With this information in hand, we can finally start writing code.
Module, or No Module
Now that we know which action method to call (addLink), we need to decide where this call should go in our system. If you’re familiar with Magento’s layout system (i.e. you’ve read No Frills Magento Layout), you know you don’t necessarily need a new Magento module to manipulate the layout. The local.xml file is a fine place for customizations you won’t be distributing. However, since we’re going to need a new controller for our new page, we’re going to need to create a new module. Because of this, its better to keep our layout updates contained in this module as well. Asking future developers to scour local.xml and try to tie particular update blocks back to particular module functionality is asking a lot.
So, after we create our base module (Pulsestorm_Customerpage for this article), we’ll want to add a layout update xml file to the frontend area. Like many things in Magento, this is a two step process. First, we add the following node to our module’s config.xml file
<!-- File: app/code/community/Pulsestorm/Customerpage/etc/config.xml -->
<config>
    <!-- ... -->
    <frontend>
        <layout>
            <updates>
                <pulsestorm_customerpage module="Pulsestorm_Customerpage">
                    <file>pulsestorm_customerpage.xml</file>
                </pulsestorm_customerpage>
            </updates>
        </layout>
    </frontend>
</config>
This tells Magento to look for a new layout file named pulsestorm_customerpage.xml. You can actually use any name you’d like for this file, but general Magento best practices are to base its name on your module name. This helps avoid conflicts with the thousands of other Magento modules out in the wild.
Before we get to step 2, there’s a few other things about this XML node we should keep in mind. This goes under the <frontend/> node because we want to add this XML file to the frontend application (or “area” in Magento speak). If we wanted to add a layout XML file to the backend application, we’d be working under the <adminhtml/> section. The pulsestorm_customerpage node
<!-- File: app/code/community/Pulsestorm/Customerpage/etc/config.xml -->
<pulsestorm_customerpage module="Pulsestorm_Customerpage">
    <file>pulsestorm_customerpage.xml</file>
</pulsestorm_customerpage>
is one of those nodes whose name Magento does not derive any semantic meaning from. However, it does need to be uniquely named to avoid conflicts with other XML files, so again the full module name is preferred.
Finally, there’s the module attribute of the node itself.
module="Pulsestorm_Customerpage"
Whenever you see a module= in a Magento XML file, it’s there to answer one question:
Which module’s data helper method should I use to translate things in this section of XML
There are time where Magento will want to run strings in your layout XML file through its locale translation engine. With the above configuration, that means Magento would run PHP code like the following when it needed to translate a string in pulsestorm_customerpage.xml.
Mage::helper('pulsestorm_customerpage')->__($a_string);
That is, the helper class pulsestorm_customerpage will be instantiated (equivalent to pulsestorm_customerpage/data, as the data helper is the default module helper), and we’ll call its awkwardly named __ (two underscores) method to translate the string.
This presents a problem. We don’t have a helper class for this module! While not strictly necessary, it’s usually a good idea to create a default data helper for your module. You can do so by adding the following code to your config.xml
<!-- File: app/code/community/Pulsestorm/Customerpage/etc/config.xml -->
<config>
    <!-- ... -->
    <global>
        <helpers>
            <pulsestorm_customerpage>
                <class>Pulsestorm_Customerpage_Helper</class>
            </pulsestorm_customerpage>
        </helpers>
    </global>
</config>
and then creating a helper class.
#File: app/code/community/Pulsestorm/Customerpage/Helper/Data.php
<?php
class Pulsestorm_Customerpage_Helper_Data extends Mage_Core_Helper_Abstract
{
}
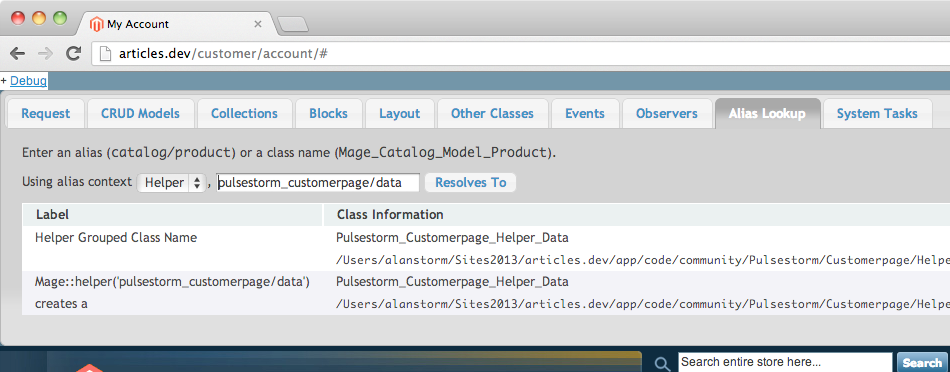
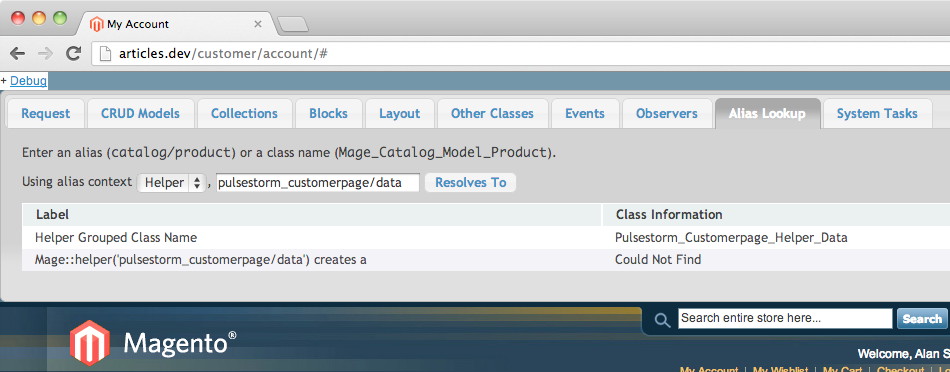
You can test that your helper class is working by using the Alias Lookup tab in Commerce Bug. Just choose “Helper” from the drop down menu, enter the full class alias into the text field, and click “Resolves To”. If your helper is setup correctly, you’ll see the class name and file location returned
If it’s not, you’ll see a Could Not Find error message.
Adding the Layout XML Update File
That small digression done, next we need to add the actual XML file to our layout. Here we have another choice to make — does this layout file go in our theme’s folder, or the default Magento base package.
If you wanted this new customer account page and link to apply only to a specific theme, then you’d place the layout xml file in that theme’s layout folder. For example, if this page should only show up in the modern theme, we’d place it in
app/design/frontend/default/modern/layout
However, we want this new page and link to show up in all themes. In that case, our XML file goes in the base design package’s layout folder. Specifically
#File: app/design/frontend/base/default/layout/pulsestorm_customerpage.xml
<layout>
</layout>
At this point, you can clear your Magento cache and reload the page. While nothing new will happen, Magento should have loaded your pulsestorm_customerpage.xml file. A quick way to test your configuration is, (with developer mode on), deliberately introduce a non-well-formed XML error into your document.
#File: app/design/frontend/base/default/layout/pulsestorm_customerpage.xml
<layout>
     <foo></fooo>
</layout>
Clear your cache and reload the page with the above in place, and (assuming you’re running in developer mode) Magento should crash with something like the following
Warning: simplexml_load_string() [function.simplexml-load-string]: Entity: line 2: parser error : Opening and ending tag mismatch: foo line 2 and bar  in app/code/core/Mage/Core/Model/Layout/Update.php on line 444

#0 [internal function]: mageCoreErrorHandler(2, 'simplexml_load_...', '/Users/alanstor...', 444, Array)
#1 app/code/core/Mage/Core/Model/Layout/Update.php(444): simplexml_load_string('?    getFileLayoutUpdatesXml('frontend', 'default', 'default', '1')
#3 /Users/alanstorm/path/to/magento/app/code/core/Mage/Core/Model/Layout/Update.php(347): Mage_Core_Model_Layout_Update->fetchFileLayoutUpdates()
#4 /Users/alanstorm/path/to/magento/app/code/core/Mage/Core/Model/Layout/Update.php(246): Mage_Core_Model_Layout_Update->fetchPackageLayoutUpdates('default')
#5 /Users/alanstorm/path/to/magento/app/code/core/Mage/Core/Model/Layout/Update.php(224): Mage_Core_Model_Layout_Update->merge('default')
#6 /Users/alanstorm/path/to/magento/app/code/core/Mage/Core/Controller/Varien/Action.php(306): Mage_Core_Model_Layout_Update->load()
#7 /Users/alanstorm/path/to/magento/app/code/core/Mage/Core/Controller/Varien/Action.php(259): Mage_Core_Controller_Varien_Action->loadLayoutUpdates()
#8 /Users/alanstorm/path/to/magento/app/code/core/Mage/Customer/controllers/AccountController.php(107): Mage_Core_Controller_Varien_Action->loadLayout()
#9 /Users/alanstorm/path/to/magento/app/code/core/Mage/Core/Controller/Varien/Action.php(419): Mage_Customer_AccountController->indexAction()
#10 /Users/alanstorm/path/to/magento/app/code/core/Mage/Core/Controller/Varien/Router/Standard.php(250): Mage_Core_Controller_Varien_Action->dispatch('index')
#11 /Users/alanstorm/path/to/magento/app/code/core/Mage/Core/Controller/Varien/Front.php(176): Mage_Core_Controller_Varien_Router_Standard->match(Object(Mage_Core_Controller_Request_Http))
#12 /Users/alanstorm/path/to/magento/app/code/core/Mage/Core/Model/App.php(354): Mage_Core_Controller_Varien_Front->dispatch()
#13 /Users/alanstorm/path/to/magento/app/Mage.php(683): Mage_Core_Model_App->run(Array)
#14 /Users/alanstorm/path/to/magento/index.php(87): Mage::run('', 'store')
#15 {main}
This crash lets us know Magento is trying to load the XML file, which means our config.xml and file location match up. Be sure to remove your <foo></fooo> before moving on.
Picking the Right Layout Handle
Now that we have a custom layout file added to the system, we need to decide on the right layout handle. Handles are sort of like layout specific events (No Fills Magento Layout can fill you in on the details). We want to find one that’s shared by all the customer account pages.
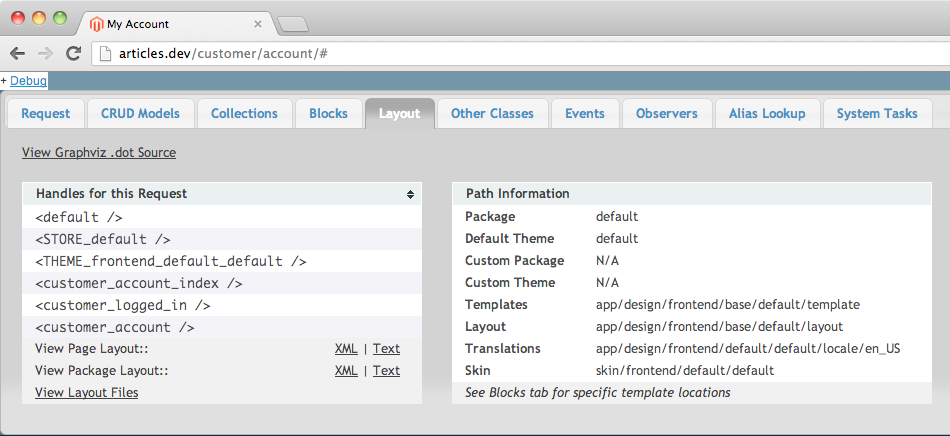
Clicking around, we can see our pickings are slim. For example, the dashboard page uses the following handles
but the Account Information page uses these handles
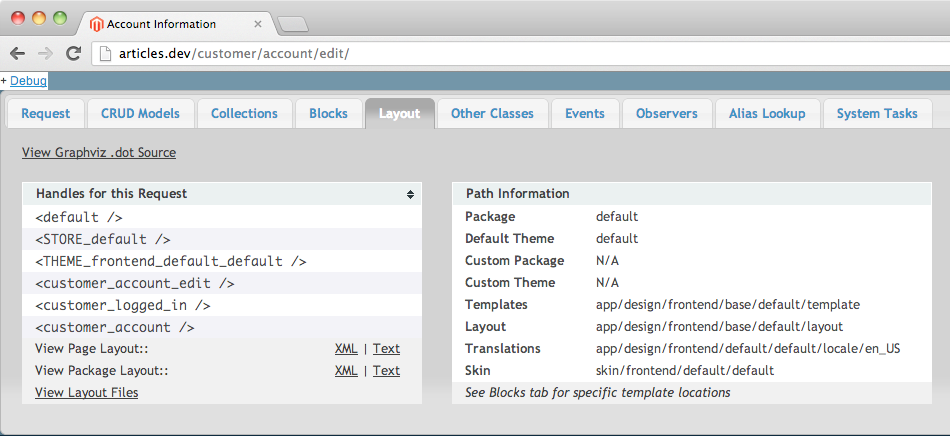
So, while <default />, <STORE_default />, <THEME_frontend_default_default />, and <customer_logged_in /> are all shared, they’re too generic for our needs. The only other handles are the full action name handles, customer_account_edit and customer_account_index. We appear to be out of luck.
Here’s another example where we need to think like a Magento core developer. They probably ran into a similar problem, so it seems reasonable to assume there’s a way to share layout information between multiple handles. Even if we don’t want to make that assumption, taking a look at their implementation is still a good idea.
Let’s take a look at the customer_account_index layout handler. If you go to Commerce Bug’s Layout tab and click on the View Package Layout link

you’ll be able to view the entire combined Layout XML tree. If you search for customer_account_index, you’ll find the following node.
<customer_account_index translate="label">
    <label>Customer My Account Dashboard</label>
    <update handle="customer_account" />
    <!-- ... -->
</customer_account_index>
Ah ha! The second node is an <update/> tag, which tells Magento to issue the generic handler <customer_account/>.
If you take a look at the customer_account_edit handler in the same package layout
<customer_account_edit translate="label">
    <label>Customer Account Edit Form</label>
    <update handle="customer_account"/>
    <!-- ... -->
</customer_account_edit
you’ll see the same call to <update handle="customer_account"/>. In fact, if you looked at all the account dashboard pages, you’ll see the same call. That means we can use the <customer_account/> handle to add our own link! Let’s give it a try.
#File: app/design/frontend/base/default/layout/pulsestorm_customerpage.xml
<layout>
    <customer_account>
        <reference name="customer_account_navigation">
            <action method="addLink">
                <name>our_new_section</name>
                <path>pulsestorm_customerpage/index/index</path>
                <label>Our New Account Section</label>
            </action>
        </reference>
    </customer_account>
</layout>
After adding the above to your layout update XML file and clearing your Magento cache, reload the page and
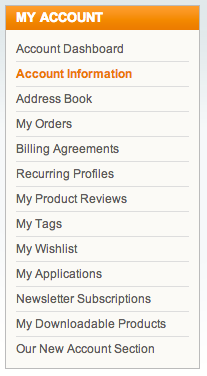
Viola! Our new link shows up with the other My Account links, and points to the URL provided in the path parameter
http://store.example.com/pulsestorm_customerpage/index/index/
Pats on the back for everyone.
Creating the Controller Action Method
Of course, we’re far from done. If we click on our new link, we’re greeted by the dreaded Magento 404 page. We need to actually add routing to our config.xml file, and then add a controller to our module, (see the original Magento developer series if you’re not clear on these concepts)
If we take a look at our URL
http://store.example.com/pulsestorm_customerpage/index/index/
We have a frontname of pulsestorm_customerpage, a controller name of index and an action method name that’s index as well.
With a frontname of pulsestorm_customerpage, we’ll use the following XML to setup our config.xml routing node. (Be sure to leave your existing configuration intact (the <!-- ... --> below)
<!-- File: app/code/community/Pulsestorm/Customerpage/etc/config.xml -->
<config>
    <!-- ... -->
    <frontend>
        <!-- ... -->
        <routers>
            <pulsestorm_customerpage>
                <use>standard</use>
                <args>
                    <module>Pulsestorm_Customerpage</module>
                    <frontName>pulsestorm_customerpage</frontName>
                </args>
            </pulsestorm_customerpage>
        </routers>
    </frontend>
</config>
After that, create an index controller with the following name/contents
#File: app/code/community/Pulsestorm/Customerpage/controllers/IndexController.php
<?php
class Pulsestorm_Customerpage_IndexController extends Mage_Core_Controller_Front_Action {

}
Finally, add an indexAction method to our controller
#File: app/code/community/Pulsestorm/Customerpage/controllers/IndexController.php
<?php    class Pulsestorm_Customerpage_IndexController extends Mage_Core_Controller_Front_Action {
    public function indexAction()
    {
        var_dump(__METHOD__);
    }
}
With the above in place, if we clear our cache and reload our http://articles.dev/pulsestorm_customerpage/index/index/ url, we should see the following text
string 'Pulsestorm_Customerpage_IndexController::indexAction' (length=52)
If we replace the crude var_dump with Magento’s standard layout calls
#File: app/code/community/Pulsestorm/Customerpage/controllers/IndexController.php
public function indexAction()
{
    $this->loadLayout();
    $this->renderLayout();
}
we’ll have our UI chrome/design as well
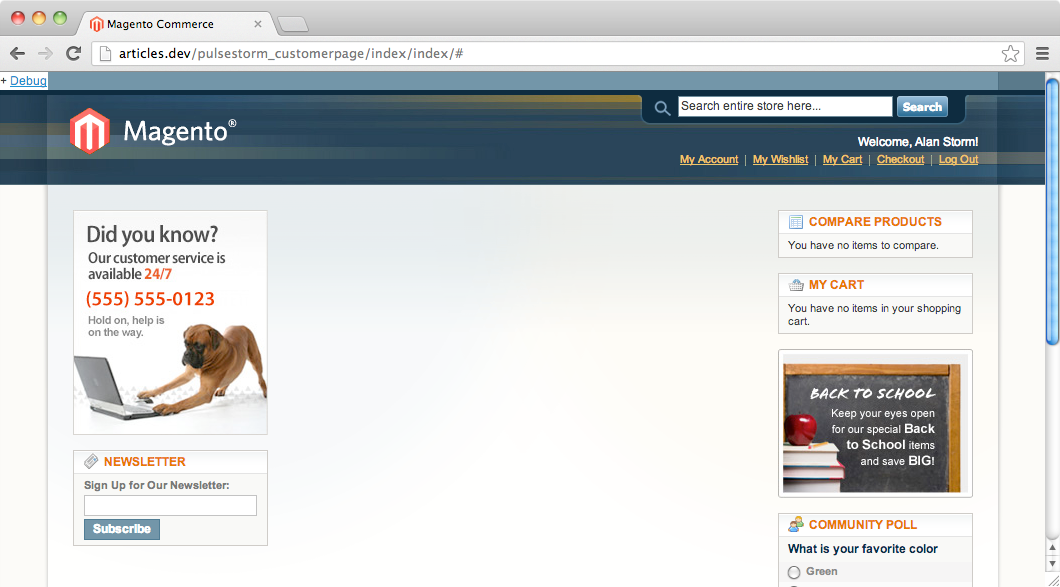
While that’s better, we’re out of the woods yet. Our page is rendering as a generic Magento page, and not a customer account page. Also, if you attempt to access the URL directly without logging in, you’ll find that it allows both logged in and not logged in users access.
A developer’s work is never done.
Reusing Magento Code
Again, here we’ll want to think like a Magento developer. If we hop back to the standard account pages and look at Commerce Bug’s request tab, we can see that they all have different controller classes (two shown below)
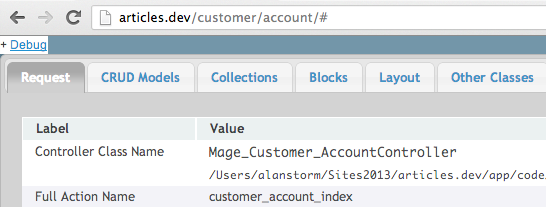
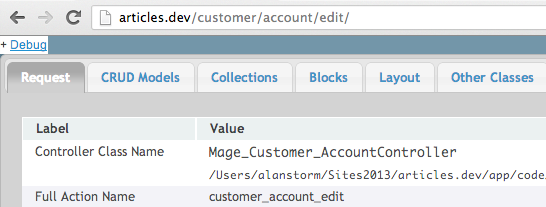
However, if we examine a few of these classes, we can see a variety of different methods for authenticating the user session
#File: app/code/core/Mage/Customer/controllers/AccountController.php
public function preDispatch()
{
    // a brute-force protection here would be nice

    parent::preDispatch();

    if (!$this->getRequest()->isDispatched()) {
        return;
    }

    $action = $this->getRequest()->getActionName();
    $openActions = array(
        'create',
        'login',
        'logoutsuccess',
        'forgotpassword',
        'forgotpasswordpost',
        'resetpassword',
        'resetpasswordpost',
        'confirm',
        'confirmation'
    );
    $pattern = '/^(' . implode('|', $openActions) . ')/i';

    if (!preg_match($pattern, $action)) {
        if (!$this->_getSession()->authenticate($this)) {
            $this->setFlag('', 'no-dispatch', true);
        }
    } else {
        $this->_getSession()->setNoReferer(true);
    }
}

#File: app/code/core/Mage/Customer/controllers/AddressController.php
public function preDispatch()
{
    parent::preDispatch();

    if (!Mage::getSingleton('customer/session')->authenticate($this)) {
        $this->setFlag('', 'no-dispatch', true);
    }
}

#File: app/code/core/Mage/Sales/controllers/OrderController.php
public function preDispatch()
{
    parent::preDispatch();
    if (!$this->getRequest()->isDispatched()) {
        return;
    }
    if (!$this->_getSession()->authenticate($this)) {
        $this->setFlag('', 'no-dispatch', true);
    }
}

#File: app/code/core/Mage/Sales/controllers/Billing/AgreementController.php
public function preDispatch()
{
    parent::preDispatch();
    $action = $this->getRequest()->getActionName();
    $loginUrl = Mage::helper('customer')->getLoginUrl();

    if (!Mage::getSingleton('customer/session')->authenticate($this, $loginUrl)) {
        $this->setFlag('', self::FLAG_NO_DISPATCH, true);
    }
}

#File: app/code/core/Mage/Sales/controllers/Recurring/ProfileController.php
public function preDispatch()
{
    parent::preDispatch();
    if (!Mage::getSingleton('customer/session')->authenticate($this)) {
        $this->setFlag('', self::FLAG_NO_DISPATCH, true);
    }
}

#File: app/code/core/Mage/Review/controllers/CustomerController.php
public function indexAction()
{
    if( !Mage::getSingleton('customer/session')->isLoggedIn() ) {
        Mage::getSingleton('customer/session')->authenticate($this);
        return;
    }
    //...
}

public function viewAction()
{
    if( !Mage::getSingleton('customer/session')->isLoggedIn() ) {
        Mage::getSingleton('customer/session')->authenticate($this);
        return;
    }

    //...
}

public function removeAction()
{
    if( !Mage::getSingleton('customer/session')->isLoggedIn() ) {
        Mage::getSingleton('customer/session')->authenticate($this);
        return;
    }
    //...
}

#File: app/code/core/Mage/Wishlist/controllers/IndexController.php
public function preDispatch()
{
    parent::preDispatch();

    if (!$this->_skipAuthentication && !Mage::getSingleton('customer/session')->authenticate($this)) {
        $this->setFlag('', 'no-dispatch', true);
        if (!Mage::getSingleton('customer/session')->getBeforeWishlistUrl()) {
            Mage::getSingleton('customer/session')->setBeforeWishlistUrl($this->_getRefererUrl());
        }
        Mage::getSingleton('customer/session')->setBeforeWishlistRequest($this->getRequest()->getParams());
    }
    if (!Mage::getStoreConfigFlag('wishlist/general/active')) {
        $this->norouteAction();
        return;
    }
}

#File: app/code/core/Mage/Oauth/controllers/Customer/TokenController.php
public function preDispatch()
{
    parent::preDispatch();
    $this->_session = Mage::getSingleton($this->_sessionName);
    if (!$this->_session->authenticate($this)) {
        $this->setFlag('', self::FLAG_NO_DISPATCH, true);
    }

}
#File: app/code/core/Mage/Downloadable/controllers/CustomerController.php
public function preDispatch()
{
    parent::preDispatch();
    $action = $this->getRequest()->getActionName();
    $loginUrl = Mage::helper('customer')->getLoginUrl();

    if (!Mage::getSingleton('customer/session')->authenticate($this, $loginUrl)) {
        $this->setFlag('', self::FLAG_NO_DISPATCH, true);
    }
}
If we can put aside this classic case of development teams not talking to one another, a pattern does emerge here. Most of the controllers put the authentication checks in the preDispatch method, and do so with code that looks like this.
public function preDispatch()
{
    parent::preDispatch();
    $action = $this->getRequest()->getActionName();
    $loginUrl = Mage::helper('customer')->getLoginUrl();

    if (!Mage::getSingleton('customer/session')->authenticate($this, $loginUrl)) {
        $this->setFlag('', self::FLAG_NO_DISPATCH, true);
    }
}
Differences aside, this should do for our controller. Let’s add a preDispatch method to our controller class
#File: app/code/community/Pulsestorm/Customerpage/controllers/IndexController.php
class Pulsestorm_Customerpage_IndexController extends Mage_Core_Controller_Front_Action
{
    //...
    public function preDispatch()
    {
        parent::preDispatch();
        $action = $this->getRequest()->getActionName();
        $loginUrl = Mage::helper('customer')->getLoginUrl();

        if (!Mage::getSingleton('customer/session')->authenticate($this, $loginUrl)) {
            $this->setFlag('', self::FLAG_NO_DISPATCH, true);
        }
    }
    //...
}
If we attempt to access our page as a non-logged in user, we should now be redirected to the login page as expected.
Next up is the page layout itself.

We still have no My Account section in the sidebar, and the page appears to be using the three column layout instead of the two column layout.
Our first instincts may be to ask
What layout blocks and templates do we need to add to have a sidebar?
However, if we think back to earlier in this article, we already have a better solution. We know the core Magento pages pulled in shared layout sections by using the <update/> tag.
<customer_account_index translate="label">
    <label>Customer My Account Dashboard</label>
    <update handle="customer_account" />
    <!-- ... -->
</customer_account_index>
We should be able to do the same with our page. If you’re unsure of the full action name handle for your page, just navigate to it and look at Commerce Bug’s Layout tab
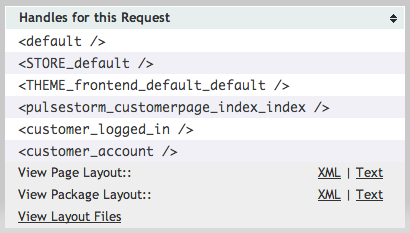
So, that’s pulsestorm_customerpage_index_index for our tutorial module. Go back to our module’s layout XML file, and add the following second level node.
#File: app/design/frontend/base/default/layout/pulsestorm_customerpage.xml
<layout>
    <!-- ... -->
    <pulsestorm_customerpage_index_index>
        <update handle="customer_account" />
    </pulsestorm_customerpage_index_index>
    <!-- ... -->
</layout>
Here we’ve added a new full action name layout handle and within that handle invoked the shared customer_account handle, just like all the core Magento layout updates. If we clear our cache and reload the page
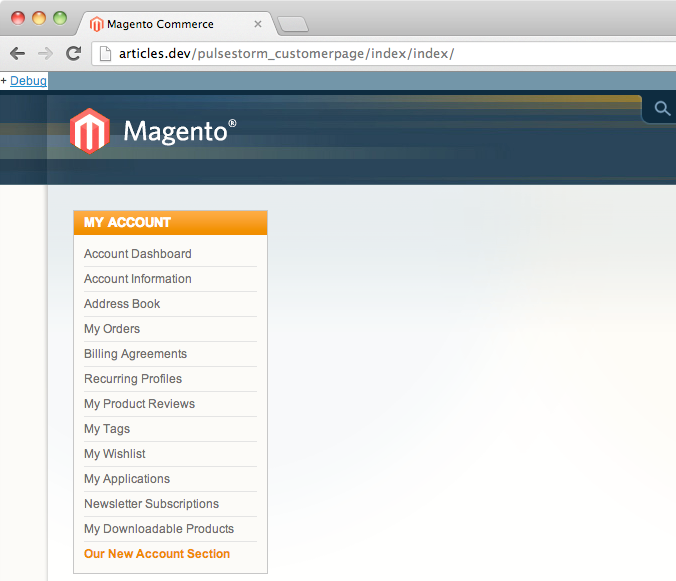
We can see out page now has the standard My Account layout features. You’ll also notice Magento has automatically “de-linked and highlighted” the Our New Account Section, as per the other navigation items. One of the small benefits of working with Magento’s systems instead of hacking in your own HTML.
Creating our Page Content
Finally, we’re ready to create our page content. If you take a look at the graphviz layout for our page

you’ll see that the content block contains a block named my.account.wrapper. This block’s class is Mage_Page_Block_Html_Wrapper (or page/html_wrapper in class alias speak).
This wrapper block is similar to the core/text_list block, in that it will render any block added to it. For example, if we modified our pulsestorm_customerpage_index_index layout handle to add a text block
<!-- #File: app/design/frontend/base/default/layout/pulsestorm_customerpage.xml -->
<pulsestorm_customerpage_index_index>
    <update handle="customer_account" />
    <reference name="my.account.wrapper">
        <block type="core/text" name="pulsestorm_customerpage_content">
            <action method="setText"><text><![CDATA[
                <h1>Look at me!</h1>
            ]]></text></action>
        </block>
    </reference>
</pulsestorm_customerpage_index_index>
We’d render a page that looked something like this.

Of course, putting page content in layout.xml files is a little weird, so let’s make that a template block instead.
<!-- #File: app/design/frontend/base/default/layout/pulsestorm_customerpage.xml -->
<pulsestorm_customerpage_index_index>
    <update handle="customer_account" />
    <reference name="my.account.wrapper">
        <block type="core/template" name="pulsestorm_customerpage_content" template="pulsestorm_customerpage.phtml"/>
    </reference>
</pulsestorm_customerpage_index_index>
And of course, that means we actually need to add the pulsestorm_customerpage.phtml template to the system. Like our layout file, we’re going to place this in the base design package to ensure that all themes have access to it.
#File: app/design/frontend/base/default/template/pulsestorm_customerpage.phtml
<h1>Hey look at me, I'm in a template</h1>
Clear your cache, reload with the above in place, and you you’ll see your template rendered on the page

Finally, we’ll want to get the Magento-ish UI around your page content (as well as the Magento-ish class names so it’s themed along with the rest of the site). There’s no magic here — this is just pure HTML production work. Your best bet for some examples here is to look at the core templates for the same sections. We’ll leave you with a simple panel in your new customer account module
#File: app/design/frontend/base/default/template/pulsestorm_customerpage.phtml
<div class="dashboard">
    <?php echo $this->getMessagesBlock()->getGroupedHtml() ?>
    <div class="box-account box-info">
        <div class="box-head">
            <h2><?php echo $this->__('Our New Account Section') ?></h2>
        </div>
    </div>
</div>

and a pointer to the other templates used by the core.
#Customer Templates
customer/account/dashboard.phtml
customer/account/dashboard/address.phtml
customer/account/dashboard/hello.phtml
customer/account/dashboard/info.phtml
customer/account/dashboard/newsletter.phtml
customer/account/link/back.phtml
customer/address/book.phtml
customer/address/edit.phtml
customer/form/edit.phtml

#Downloadables Templates
downloadable/customer/products/list.phtml

#oAuth Templates
oauth/customer/token/list.phtml

#Review Templates
review/customer/list.phtml

#Sales Templates
sales/billing/agreement/view.phtml
sales/billing/agreements.phtml
sales/order/comments.phtml
sales/order/creditmemo/items.phtml
sales/order/invoice/items.phtml
sales/order/items.phtml
sales/order/shipment/items.phtml
sales/order/totals.phtml
sales/recurring/grid.phtml
sales/recurring/profile/view.phtml
sales/recurring/profiles.phtml

#Tag Templates
tag/customer/tags.phtml
tag/customer/view.phtml
tax/order/tax.phtml

#Wishlist Templates
wishlist/button/share.phtml
wishlist/button/tocart.phtml
wishlist/button/update.phtml
wishlist/item/column/cart.phtml
wishlist/item/column/image.phtml
wishlist/item/column/info.phtml
wishlist/item/column/remove.phtml
wishlist/item/list.phtml
wishlist/sharing.phtml
wishlist/view.phtml
Wrap Up
While intimidating to newcomers — most Magento features really aren’t all that complicated. When working with any new system there’s a temptation, (and increasingly, business pressure) to grab the code from github and stack whacking away at it.
A better approach is to take the time to learn a few new concepts, have a tool like Commerce Bug at your disposal, and become an expert at navigating your environment. While particular systems will come and go, the meta-skill of learning how to learn an unfamiliar system will never go out of style so long as we’re building things with, and on top of, computer systems.

