Today we’re going to talk about an offshoot of the Hyvä Themes project called Hyvä Admin. This project is being worked on along side Hyvä, but is a stand alone project you can run on any Magento 2.4+ system. In other words, you don’t need to purchase Hyvä Themes to use Hyva Admin.
Hyvä Admin’s stated goal is to bring the same fun and ease of use to custom Magento Admin development that Hyvä Themes brings to Magento’s front end.
Hyvä Themes and the Backend
The Hyvä Themes project is, at it’s heart, a Magento 2 Frontend Theme. Magento 2 Frontend Themes allow you to change the appearance and behavior of the website where users shop for products.
Hyvä Themes is not a backend theme. Backend themes aren’t really a thing in Magento — while the backend does use the same layout and theme system that the frontend does, changing the backend theme isn’t something that Magento 2 supports easily out of the box. It’s possible, but not a thing people do often and there’s lots of sharp edges if you try.
Hyvä Themes is generally unconcerned with the backend. When you’re using a Magento system that’s themed with Hyvä Themes on the frontend, your backend system is the same old Magento 2 code you’ve come to expect. Navigation still works the same, grids still work the same, and forms still work the same.
What is Hyvä Admin
The Hyvä Admin project is an open source licensed project started by long time Magento community member Vinai Kopp. Also, despite the shared name, Hyvä Admin does not require Hyvä Themes — it’s a stand alone project anyone can install on their Magento system.
Hyvä Admin does not set out to replace Magento 2’s backend. Hyvä Admin is a developer’s toolkit (an SDK, a library, etc.) that helps developers create new backend admin elements in their Magento systems. Right now the project allows you to create backend data grids. These data grids use the same javascript framework as Hyvä Themes, (Alpine.js), but as a user you don’t need to be aware of this. Your primary interaction with Hyvä Admin will be via configuration.
At the time of this writing Hyvä Admin is limited to data grid generation, but the project has a long term goal of simplifying backend UI/form development as well.
Hyvä Admin Code
At its most basic, creating a UI grid with Hyvä Admin is a 4 step process
- Create a Magento 2 Admin Landing Page using standard tooling (perhaps via pestle?)
-
Create a Hyvä Admin XML file
-
Add a Hyvä Admin layout handle to your full action name layout handle XML file
-
Add a grid block to your full action name layout handle XML file
This may sound familiar. Magento 2’s UI Components use a similar pattern for building grids. The big difference with Hyvä Admin is how simple this is compared to Magento’s standard tooling.
For example — if you wanted to create a grid of all the CMS pages in Magento, all you’d need to do is add an XML configuration file that defines the grid’s data source
# File: app/code/Pulsestorm/HelloHyva/view/adminhtml/hyva-grid/cms-page.xml
<?xml version="1.0"?>
<grid xmlns:xsi="http://www.w3.org/2001/XMLSchema-instance"
      xsi:noNamespaceSchemaLocation="urn:magento:module:Hyva_Admin:etc/hyva-grid.xsd">
    <source>
        <collection>\Magento\Cms\Model\ResourceModel\Page\Collection</collection>
    </source>
</grid>
Then add the hyva_admin_grid update handle to your landing page’s layout handle XML file
# File: app/code/Pulsestorm/HelloHyva/view/adminhtml/layout/pulsestorm_hellohyva_things_index_index.xml
<?xml version="1.0"?>
<page xmlns:xsi="http://www.w3.org/2001/XMLSchema-instance" xsi:noNamespaceSchemaLocation="urn:magento:framework:View/Layout/etc/page_configuration.xsd">
    <update handle="hyva_admin_grid"/>
</page>
and then add a Hyva\Admin\Block\Adminhtml\HyvaGrid block to the page, passing the name of the grid as an argument
# File: app/code/Pulsestorm/HelloHyva/view/adminhtml/layout/pulsestorm_hellohyva_things_index_index.xml

<?xml version="1.0"?>
<page xmlns:xsi="http://www.w3.org/2001/XMLSchema-instance" xsi:noNamespaceSchemaLocation="urn:magento:framework:View/Layout/etc/page_configuration.xsd">
    <update handle="hyva_admin_grid"/>
    <referenceContainer name="content">
        <block class="Hyva\Admin\Block\Adminhtml\HyvaGrid" name="demo-grid">
            <arguments>
                <argument name="grid_name" xsi:type="string">cms-page</argument>
            </arguments>
        </block>
    </referenceContainer>
</page>
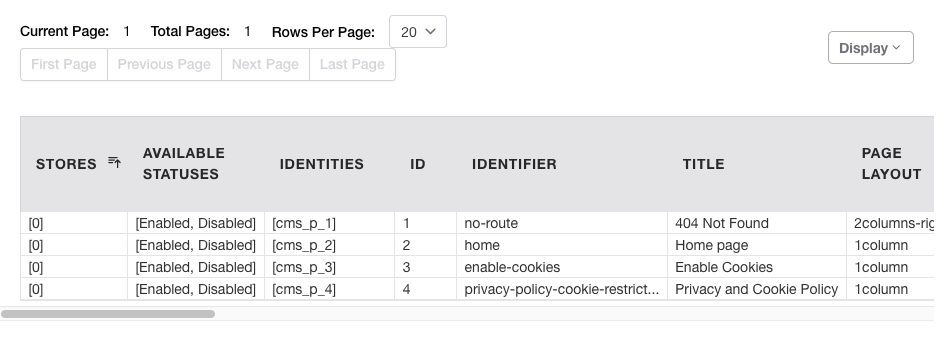
With the above configuration, you’ll get a grid that looks something like this

That’s all your CMS pages, in grid will full pagination and every single column. The grid Domain Specific Language (DSL) also allows you to control what does and doesn’t appear in the grid. For example, if you only wanted the title and update_date columns in your grid, you’d use an XML configuration that looked like this
#File: app/code/Pulsestorm/HelloHyva/view/adminhtml/hyva-grid/cms-page.xml
<?xml version="1.0"?>
<grid xmlns:xsi="http://www.w3.org/2001/XMLSchema-instance"
      xsi:noNamespaceSchemaLocation="urn:magento:module:Hyva_Admin:etc/hyva-grid.xsd">
    <source>
        <collection>\Magento\Cms\Model\ResourceModel\Page\Collection</collection>
    </source>
    <columns>
      <include>
        <column name="title"/>
        <column name="update_time"/>
      </include>
    </columns>
</grid>
giving you a grid that looks like this

The Hyvä Admin docs have more information on all the available features (action links, mass actions, etc.) and there’s an example/test module that shows some of the more advanced features being used.
Why Hyvä Admin is Better
You might wonder if this is any different than Magento 2’s stock approach. From an architect’s point of view, both Hyvä Admin and Magento’s UI Component systems use an XML based DSL to configure where a grid gets its data from and how that grid behaves. From their lofty tower, your average software architect would shrug their shoulders and call it a wash.
However — to a working software developer the difference is in the details. Specifically the details of the XML DSL. Remember the XML we used to configure a data source for the grid?
<source>
    <collection>\Magento\Cms\Model\ResourceModel\Page\Collection</collection>
</source>
Here’s the equivalent code in Magento’s UI Component system.
<dataSource name="cms_page_listing_data_source" component="Magento_Ui/js/grid/provider">
    <settings>
        <storageConfig>
            <param name="indexField" xsi:type="string">page_id</param>
        </storageConfig>
        <updateUrl path="mui/index/render"/>
    </settings>
    <aclResource>Magento_Cms::page</aclResource>
    <dataProvider class="Magento\Cms\Ui\Component\DataProvider" name="cms_page_listing_data_source">
        <settings>
            <requestFieldName>id</requestFieldName>
            <primaryFieldName>page_id</primaryFieldName>
        </settings>
    </dataProvider>
</dataSource>
The UI Component code is far more verbose and complicated. That’s due to the actual problem each DSL sets out to solve.
The Hyvä Admin system is designed to allow the end user (you!) to configure the class that will provide the grid’s data.
The Magento 2 DSL is designed to allow you to configure how Magento will instantiate the object that generates the grid’s data.
It’s a subtle distinction, but DSLs that take the later approach tend to add complexity to a system rather than simplify them. In order to reason about Magento’s UI Component DSL you need to actually understand how the underlying objects interact with each other. The Hyvä Admin DSL hides these details from you, and allows you to enter only the configuration that’s related to the grid fields you want to see. This allows you to spend your limited time and attention on other tasks.
The end result is a system that may not be as flexible as the built-in UI Component system, but is much easier to use. It is, perhaps, in another timeline, what Magento 2’s UI systems should have looked like all along.
